
How to Connect Epson XP-8600 Wireless Printer to Windows & Mac?
March 22, 2025

The Epson XP-8600 is a premium photo printer with advanced features, like wireless printing capabilities. It has advanced connectivity options that allow you to connect the device to Windows and Mac computers easily.

While the connection process is simple, some users may face difficulties. In this case, with the help of the additional guides, you can complete the connection in no time.
So, ready to learn 'how to connect Epson printer to computer'? Follow this guide to learn about the printer setup process for Windows and Mac computers.
Connect Epson XP-8600 Printer to Windows Wirelessly
Follow the guide below carefully to learn completely about the wireless setup process for connecting a printer to your Windows computer.
Step 1: Follow the Steps on Your Windows
- Prepare your printer for the connection by connecting it to a power source, inserting the ink cartridges, and loading the paper.
- On your Windows PC, explore the Epson website on a web browser.
- On the website, type your printer's full name and click on the Search option.
- After that, the device will start installing the required software.
- When a prompt appears on the screen, click on the Yes option.
- On the 'Select Your Connection Method' button, click on the 'Connect via Wi-Fi automatically' radio button and click on Next.
- Next, select your network SSID and then enter the password.
- On the 'Connect to wireless LAN automatically' screen, click Next.
- Click on 'Connect' by manually entering a network name (SSID) and password, then click Next.
Step 2: Follow these Steps on Printer
- Move to your printer display and tap on the Home icon.
- Then, choose the Wi-Fi option and tap on Start Setup.
- Next, tap on 'Wi-Fi Setup Wizard' and choose your network name.
- Using the control panel, type the password for your network and then select OK. (You can also select your network name manually if you want)
- The setup complete page will show up on the screen when the connection is complete.
- After that, select the Next option.
Connect Epson XP-8600 Printer to Mac Wirelessly
Follow-ups are the steps you can follow to get a full understanding of how to connect Epson printer to computer (Mac). Make sure to learn all the steps carefully.
Method 1: Using Epson Connect Printer Setup Utility
- First of all, you need to download the Epson Connect Printer Setup Utility on your device and then run it.
- After that, select the Continue option.
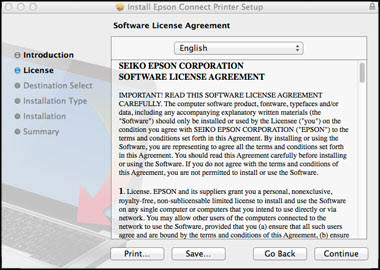
- On the Software License Agreement wizard, click on the Continue option and then select Agree.
- Then, select Install and then choose Close.
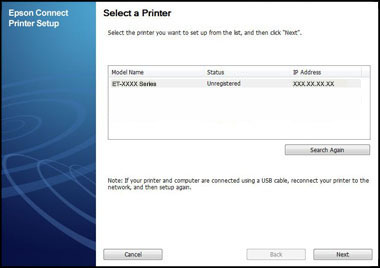
- Choose your printer’s name and then select Next. (Note: You can go to the Finder window If the window doesn't automatically appear. There, you should choose Application > Epson Software and then double-click Epson Connect Printer Setup.)
- On the next page, click on the Printer Registration radio button and then select Next.
- Once the 'Register a printer to Epson Connect' message shows up on the screen, click on OK.
- Also, scroll down to click on the 'I accept the Terms and Conditions' checkbox and then select Next.

- Do any of the follow-up steps suggest:
- Fill out the Create An Epson Connect Account page, then click Finish if you want to create a new account.
- In addition, click I already have an account option, fill out the Add a new printer form, and then click Add if you are connecting your printer using an existing account.
- After that, choose the Close option.
Method 2: With the Printer Driver
- In the beginning, click on the Apple menu option and select the System Preferences option.
- On the open page, click on the Printers & Scanners.
- The Printers & Scanners section will be blank if you have no other printers installed. Choose the (+) button to start adding your printer.
- Select the Add Printer or Scanner option to search for your printer.
- Choose the Epson XP-8600 printer you would like to install and click on the Use drop-down menu to select the printer driver. (Note: Epson recommends the correct driver for your product. If the Secure AirPrint driver is chosen, this may limit the functions of your printer.)
- Select the name of your printer in the Use drop-down menu.
- Choose the Add to install the printer driver.
- Now, the printer driver will be downloaded, and the setup process will be complete.
- Try to print a document to ensure everything is working properly.

Frequently Asked Questions
Question
Why Can’t I Setup My Epson Printer?
Various issues may arise during the Epson printer setup process. These are common causes of setup problems.
● The printer is not compatible with your device.
● Your device connection settings are not correct.
● There is some issue with the internet connection or the USB cables.
● You are not following the correct setup process.
● The printer is not placed within the PC/mobile connection range, etc.
In addition, there could
be various other problems. You need to figure out the key cause of the issue if
you want to fix the issue properly.
Question
How Do I Manually Connect My Epson Printer to My Mac?
These are the steps you can follow to add your printing device to your computer manually.
- Choose the Menu
option and then select the System
Preferences option.
- Next, select the Printers & Scanners option (or Print & Scan, Print
& Fax).
- Then, click on the (+) option.
- After that, select the option Add Printer or Scanner.
- Select the name of the driver and the name of your printer.
- Finally, choose the Add Printer option.
Question
How Can I Access Epson Printer Settings on Mac?
Follow the given steps if you want to access the printer settings on your Mac system.
- Firstly, go to the System Preferences window on your system.
- Select any option you see from Print & Fax, Print & Scan, or Printers & Scanners.
- Next, click on your printer’s name.
- After that, go to the Options & Supplies option.
- Go to Driver
or Options to make the changes you would like.
Enter your Comments Here: