How to Connect Xerox C310 Printer to Computer? (Easy Steps)
April 10, 2025


Want to know 'how to connect Xerox printer to computer'? The blog explains everything in a simpler manner. Xerox offers various wireless printers, like the Xerox C310. However, setting them up can be tricky, especially if you’re not used to wireless printers. This guide will show you steps on how to connect your wireless printer to your computer so you can get started with your printer hassle-free. By the end, you will know how to prepare your printer, connect it to Wi-Fi, and complete the setup process. Let’s get started on making printing easier!

Step 1: Prepare Your Printer
Before learning how to connect Xerox printer to computer, make sure it’s ready for setup. Follow the simple steps to prepare your printer so it works properly when you finally connect it. This will make setup easier for you.
- Unpack Your Printer: Remove the printer from its packaging and clear all protective coverings.
- Connect to Power: Plug your printer into a power source and turn it on. Wait for it to initialize fully.
- Connect to Wi-Fi: To connect the printer to Wi-Fi, follow these steps.
- Look at the printer’s control panel and find the menu.
- Then, navigate to the Wi-Fi settings by using the arrow keys or touchscreen.
- Find the list of wireless networks and select your network name.
- When asked, type in your Wi-Fi password carefully.
- Press "OK" or "Connect" to join the network.
- Wait for a message to confirm the printer is connected.
Step 2: Install Printer Driver
Knowing how to connect Xerox printer to computer is important. Installing the printer driver software is essential for a seamless connection. Without this software, your computer won't be able to talk to the printer, meaning it won't work properly.
Follow the simple steps described below to install the printer software on the computer:
- Turn on your computer.
- Open any browser and visit Xerox's official site.
- Navigate to the support section for your printer model.
- After that, look for the driver matching your printer model.
- Choose the right driver for your operating system (Windows or macOS).
- Download the required driver software that is compatible with your operating system.
- Once the download is complete, open the installation file.
- Next, follow the displayed steps to install the printer driver.
- After that, accept the terms and conditions.
- Finally, select your installation preferences as given.
Step 3: Add Your Printer to a Computer
To add a Xerox C310 printer to your computer, you first need to check that it is connected. The earlier steps cover how to connect your printer to the computer. After that, you can follow the steps for your computer type, like Windows or Mac, to set it up and start printing.
Here’s 'how to connect Xerox printer to computer' (Windows & macOS):
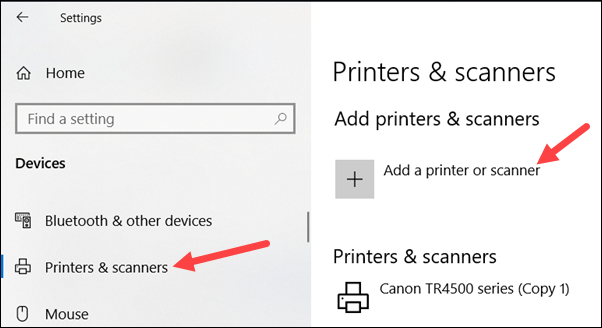
For Windows
- To connect your printer, click on the Start menu located at the lower left of your screen.
- Next, choose ‘Settings.’
- Once you’re in Settings, look for ‘Devices’ and click on it.

- From there, find ‘Printers & scanners’ and click on that option.
- You’ll then see a button that says, ‘Add a printer or scanner.’
- Click on it, and your computer will search for available printers.
- When it finds your printer, which should be listed, click on it.
- Then, select ‘Add Device’ to finish setting it up.
For Mac
- To add your printer to your computer, begin by selecting the Apple menu at the top left corner.
- Choose ‘System Preferences.’
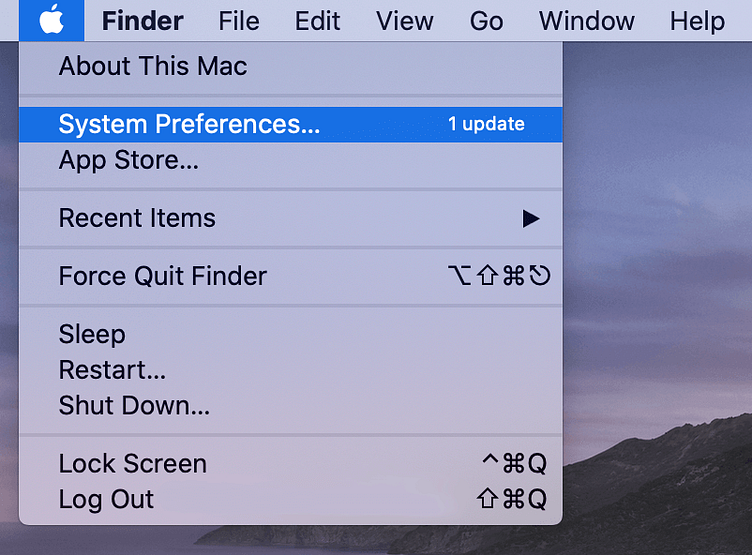
- Once there, find and click on ‘Printers & Scanners.’
- You will see a ‘+’ sign; click on it to add a new printer.
- Your Mac will search for nearby printers, and soon, you should see your printer in the list.
- When you see it, click on it.
- Then, press ‘Add’ to finish the setup.
- Now, you can print your documents easily.
- Make sure the Xerox C310 printer is turned on and connected first.
Final Words
Finally, we have explained 'how to connect Xerox printer to computer' (Windows and macOS). Connecting the wireless printer to a Windows and Mac computer is a simple process if you follow the steps outlined in this guide. Preparing your printer, installing the necessary software, and adding the printer to your device are key steps to ensure printer setup. With these instructions, you can setup your printer quickly and enjoy hassle-free printing.

Frequently Asked Questions
Question
How Do I Find My Xerox Printer’s Wireless Network Name (SSID)?
If you want to find your printer’s wireless network name, you need to follow the steps given below:
1. Turn on the printer.
2. Navigate to the printer’s control panel and select the “Network” or “Wireless” settings option.
3. Check the option for “Wireless Setup” or “Wireless Status.”
4. After that, you will see the network information, including the SSID, which is the name of your printer’s Wi-Fi network.
Question
Why Does My PC Not Detect My Xerox Printer?
Many reasons might prevent your PC from detecting the printer. Follow these steps to resolve the issue:
- Ensure
the printer and your device are added to the same Wi-Fi network.
- Check if
the printer is powered on and in a ready state.
- It also
helps to restart your router and the printer.
- Make sure that the driver is installed on your computer.
- If you use a firewall or antivirus software, they might also block the connection. You can disable them temporarily.
Question
How to Connect Xerox Wireless Printer to Laptop?
To connect your wireless printer to your laptop, follow the steps given below:
- Power on
your laptop.
- Then, go
to the "Control Panel."
- Now,
select "Devices" or
"Printers & scanners."
- Choose “Add a printer or scanner,"
and your laptop will search for available devices.
- When you
see your printer in the list, click on it.
- After
that, select "Add device."
- Perform
the directions shown on your screen to complete the setup.
- Make sure
that you have the necessary drivers installed, which can typically be
downloaded from Xerox's official support website.
Enter your Comments Here: