
How Do I Setup Epson XP-4200 Wireless Printer on Laptop? (Easy Guide)
February 21, 2025

Searching for 'How to Setup Epson wireless printer'? If yes, this blog is for you. As printers can be complex to setup for beginners, the right guidance can help you out. You can connect your Epson XP-4200 wireless printer to a laptop via USB, Bluetooth, or a Wi-Fi connection as per your requirement. Moreover, you need to download and install the necessary Epson printer drivers to complete the setup correctly.

So, let’s get started with this blog that will explain everything about the setup procedure for beginners as well as existing users. Here, you’ll learn about the wireless printer connection.
Step 1: Unbox Your Epson XP-4200 Printer
To start the Epson wireless printer setup, you first need to unbox your latest printer. Then, remove all the adhesive tapes and protective coverings from the printer’s box. Once you get the printer, check whether the printer or its components are damaged. Plus, check if it has all the important accessories, such as the power cord, USB cable, etc. If you find anything missing in the box, contact your manufacturer or vendor.
Step 2: Download & Install Printer Drivers
In the next step, you need to install the printer drivers from its official website. To download and install them, you have to follow the instructions in the section below:
- To begin, browse Epson’s official printer website on your internet browser.
- Then, type your printer’s name in the search box.
- Choose your printer from the list displayed on the screen.
- After that, you will see a list of printer driver packages on the screen.
- From there, select a suitable package for your printer and tap on the Download button.
- Next, allow your printer drivers to be downloaded.
- Go to the Downloads folder and find the downloaded file.
- Now, double-click on the file and open it.
- When you see a license agreement, check the box to agree.
- Click the Finish option to finish the installation.
- Select your printer model and tap on the Next option.
- Afterward, select the Printer Registration option and hit the Next button.
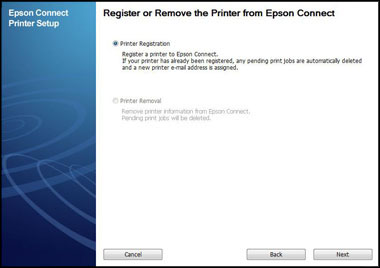
- Select Agree, and click Next.

- Continue with the steps displayed on your screen to finish the printer registration process.
Finally, your laptop will have the necessary drivers downloaded for your Epson XP-4200 wireless printer. Now, you can go to the next step.
Step 3: Connect Your Printer to a Laptop
After performing all the above steps, you can move on to connecting your printer to the computer. You can connect your printer to your system via a wireless connection. To start the Epson wireless printer setup on your computer or laptop, check out the steps below:
- To begin, check your Wi-Fi network name and password.
- Then, ensure that your printer drivers are installed correctly on your laptop.
- Now, turn on the printing device.
- Move ahead to the Control Panel on your printer and hit the Home button.
- Select the Wi-Fi setup option with the help of arrow keys.
- To continue, press OK.
- Click on OK to confirm your selection.
- In the next step, select the Wi-Fi Setup Wizard and hit OK.

- Check for your wireless network.
- When you see the correct wireless network on the screen, input the password for your wireless network.
- Lastly, click the OK button to finish the connection.
This is how the Epson wireless printer setup will be done on a Windows laptop or computer. Now, you can start printing your important files, documents, and images.
Conclusion
Finally, you have learned 'how to setup Epson printer on your laptop'. To connect a printer to a laptop, you must install the necessary printer drivers from its official website. These drivers enable the printer to communicate properly with your laptop or computer. Also, you should know which method you are going to use to finish a setup, such as a wireless connection, Bluetooth, or a USB cable method. A wireless printer connection is the best one to use.

Frequently Asked Questions
Question
How to Setup Epson Printer to Mac?
To set your printer on a Mac, follow these steps:
- Download
the Epson Connect printer utility application on your computer.
- Run this application, accept the app’s license
agreement, and hit Continue.
- Tap on
the Install button and then
accept the terms and policies.
- Choose your printer and hit the Next button.
- After that, accept the further terms and conditions.
- Activate Scan
for Cloud and Remote Print.
- When your printer is connected to Epson Connect, go to Settings.
- Choose the Wi-Fi as a mode of connection and provide
its password.
Question
Why Is My Epson Printer Not Connecting to Wi-Fi?
If you observe that
your printer isn’t connecting to a wireless network, there could be plenty of
reasons behind this. For instance, printer drivers are outdated and corrupted,
or your wireless network is poor. Hence, if you’re experiencing this issue with
your printer, you can simply turn off your firewall or the antivirus software
on the computer.
Question
What Do I Need for Epson Wireless Printer Setup?
To setup your
printer, you need a stable internet connection on your computer. Also, you can
use the USB, Bluetooth, and wireless connection methods to setup the connection
between your computer and printer. Moreover, you will need printer drivers
installed on your laptop or computer.
Enter your Comments Here: