How to Setup Xerox C235 Wireless Printer on Windows and Mac?
November 3, 2023

Are you looking forward to learning the process to setup Xerox wireless printer? Here, you will acquire an in-depth knowledge of the step-by-step process to complete the setup procedure. Xerox printers are widely used for personal, small business, and big enterprises. Also, it has seamless wireless connectivity options, making it the first choice of people.
The printer needs to be set up on a device before you can start using it. The process is relatively simple but requires proper guidance if you are doing it for the first time. So, keep reading this blog till the end to learn the complete procedure of setting up your Xerox C235 printer on a Windows and Mac computer.
Connect Xerox Printer to a Wireless Network Using WLAN
The first step of Xerox wireless printer setup is to connect the Xerox device to a wireless network your Windows or Mac device is connected to. Follow the steps below to complete the wireless connection procedure.
- First of all, prepare the printer by filling ink and paper in it and then turn it ON.
- Now, move to the Control Panel on the Xerox printer.
- Next, utilize the arrow keys or touchscreen panel to select the Network, Wi-Fi, or Wi-Fi settings option.
- After that, select the Wireless option.
- Now, the printer will start looking for wireless networks.
- With the help of the Up and Down arrow, select the network name you wish to connect.
- After selecting the network name, enter its password.
- Lastly, tap or select the OK option to finish the connection process.
Steps to Setup Xerox C235 Wireless Printer on Your macOS
After connecting your Xerox printer to a network, you can head to the setup process. Here is a comprehensive guide to do that.
- Start by downloading and installing the latest compatible Xerox printer driver from the Xerox official site.
- Once the download is complete, double-click on the Xerox Print Drivers 5.xx.x.dmg or .pkg.
- When the setup wizard opens on the screen, click on Continue.
- Read the License Agreement and choose the "I Agree" checkbox.
- Afterward, click on the option of Install to agree with the current installation location. (Or you can set another location to install the file and then select Install.
- If you see the prompt to enter the password, then type your password and then choose OK.
- From the open list of printers, click on your Xerox C235 printer and select Continue. (If you do not see your printer option, then make sure the device is ON and near your Mac device.)
- Moreover, select the OK option to accept the print queue request.
- Now, you can choose to set the printer as your default device or print a test page.
- Finally, the process to setup Xerox wireless printer on a Mac device will be complete.
If you are having any issues in the setup of your Xerox C235 printer, then get instant expert help on setupwirelessprinter.com. Simply go to the support page to chat with an expert to clear your queries or request a callback.
Steps to Setup Xerox C235 Wireless Printer on Your Windows
If you are using a Windows device to Set up your Xerox printer, then here are the steps you need to follow in order to complete the process. So, follow the below guide and do as it suggests.
- First, go to the Xerox official website and download the suitable driver for your Xerox C235 printer.
- After downloading the driver, follow the setup wizard to install it on your device.
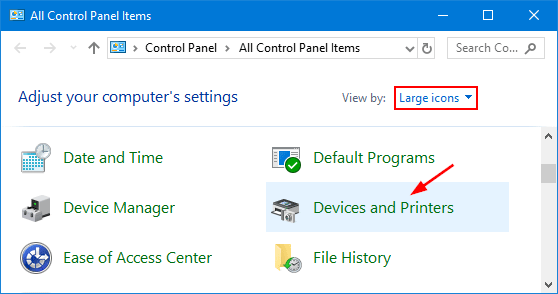
- Next, access the Control Panel window on your computer device.
- In the open window, look for the Devices and Printers option and then select Add Printer.
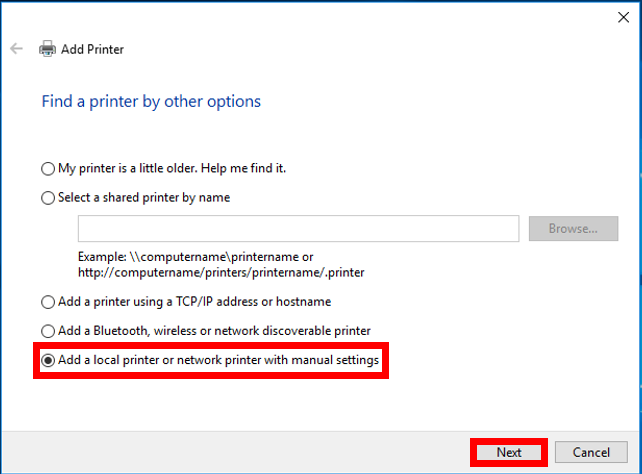
- Now, select the option The printer that I want isn't listed and then click on Add a local printer or network printer with manual settings.
- If you wish to use the previously established port, then click on Use an existing port.
- Afterward, from the open list of options, click on any Standard TCP/IP Port.
- To create a new port, click on the Create a New Port.
- Then, you have to select the option Have Disk.
- Now, click on Browse and then choose the driver.inf file for your Xerox printer.
- Henceforth, click on the Xerox C235 printer model number.
- If the printer driver was installed already, prompts appear, then click on Use the driver that is currently installed (recommended).
- In the printer name field, type the Xerox printer name.
- Then, click on the Next option to install the driver.
- Now, set the Xerox printer as default.
- Finally, the connection process will be complete.
If there are any doubts in your mind or you want expert assistance to setup Xerox wireless printer, then setupwirelessprinter.com will help you. Here, professionals offer free consultation through a phone call or live chat.
Frequently Asked Questions
Question
How Do I Setup Xerox Wireless Printer on My iOS Device?
Here are the steps you can follow to set up the Xerox printer on an iOS device.
- First, connect the printer and iOS device to the
same wireless network. (Make sure your Xerox printer supports the AirPrint.)
- After that, download the Xerox mobile app on your
iOS device.
- Then, open the app and click on Connect a device option.
- Choose the Xerox printer name from the list and
click on OK.
- Now, print a test page to confirm the connection
process is complete.
- Finally, start doing the printing work when the
setup process is complete.
Question
How to Do Xerox Wireless Printer Setup on Mac?
If you want to set up the Xerox printer on a Mac, then follow the steps below.
- Firstly, from the official Xerox support website,
download the driver install installer.
- Then, open the download file and choose the "I Agree" option in the setup
wizard.
- After that, follow the further instructions and then
click on Install.
- When the list of options appears on the screen, then
click on your printer name.
- After that, click on the OK option to complete the setup.
- Lastly, print the test copy to check if the printer
is working properly.
Question
Why Can’t I Setup My Xerox Printer?
Ample minor or major
reasons can be responsible for facing the Xerox printer setup issue. Some of
the key reasons can be incorrect drivers, following the wrong setup procedure,
devices being far from each other, wrong settings, and many others. In this case,
you have to make the required adjustment and try again. If the problem
persists, then seek professional help.


Enter your Comments Here: